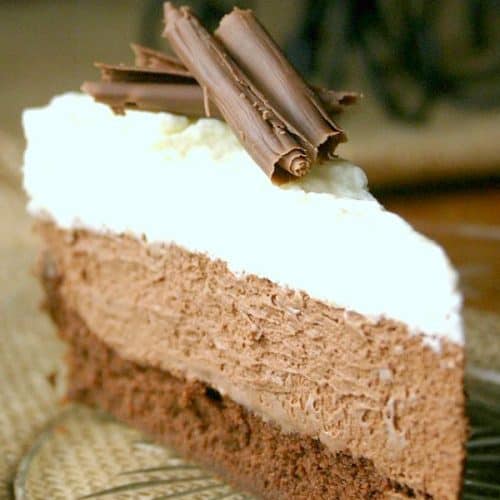
Triple chocolate mousse cake - the one and only dessert for a true chocolate lover. The perfect showstopper for a special occasion.
If you love mousse desserts, you may also like my Chocolate Mousse For Two recipe as well as the Pumpkin Mousse Pie.

TRIPLE CHOCOLATE MOUSSE CAKE
Do you see that slice up there? This is the ultimate chocolate dessert. Not only it's triple chocolate but it is made of layers of mousse. Creamy mousse, that melts in your mouth and transfers you into sweet bliss. I had this Triple Chocolate Mousse Cake on my to-make list for so long and it finally happened! We just love desserts with sweet mousse! My Pumpkin Mousse Pie is my go-to for Thanksgiving dinner.
Triple Chocolate Mousse Cake Ingredients:
- butter
- bitter-sweet chocolate
- espresso powder
- vanilla extract
- 4 eggs
- salt
- brown sugar
- cocoa powder
- water
- semi-sweet chocolate
- 3 cups whipping cream
- granulated sugar
- powdered gelatin
- white chocolate

How long does it take to make this cake?
It is also the most labor-intense dessert I have ever made. It can take up to 2 days to make it, only if you decide though. You can make it all in one day if you start early in the morning. But it's crucial to let every layer set before adding the next one. It is important to read the instructions before proceeding. You need to plan well when making this cake. You need to be patient and gentle. Lots of love goes into making this cake. And that's also why it's so rewarding in the end.
How does it taste?
You may think it's utterly rich. Well, it is in texture but because of it's made of chocolate mousse - it's airy and light. And that makes it incredibly easy to eat.

MORE MOUSSE RECIPES:
- Chocolate Mousse For Two
- Peanut Butter Mousse Chocolate Cake
- Pumpkin Mousse Pie
- Pumpkin Lush Dessert
- No-Bake Peanut Butter Cheesecake
Triple Chocolate Mousse Cake
Ingredients
1st layer:
- 6 tablespoon butter cubed
- 7 oz bittersweet chocolate chopped
- ¾ teaspoon espresso powder
- 1.5 teaspoon vanilla extract
- 4 eggs
- ⅛ teaspoon salt
- ⅓ cup packed brown sugar I used dark
2nd layer:
- 2 tablespoon unsweetened cocoa powder
- 5 tablespoon hot water
- 7 oz semi-sweet chocolate chopped
- 1.5 cup cold heavy whipping cream
- 1 tablespoon granulated sugar
- ⅛ teaspoon salt
3rd layer:
- ¾ teaspoon powdered gelatin
- 1 tablespoon water
- 6 oz white chocolate chopped
- 1.5 cup cold heavy whipping cream
Instructions
First Layer:
- Preheat your oven to 325 degrees F.
- Butter a 9" round springform pan. Set aside.
- Separate egg yolks and whites. Set aside.
- In a double boiler, melt chocolate, butter and espresso powder, whisking until smooth. Cool slightly for 5 minutes.
- Add egg yolks and vanilla extract and whisk until well combined.
- In a large mixing bowl of a stand mixer, whip egg whites with salt for 30 seconds, or until frothy. Add half of the brown sugar, sprinkling it over the frothy whites. When the sugar is well mixed in, add the remaining half. Whip until soft peaks form. It can take from 1 to 3 minutes. Keep checking your peaks.
- Whisk in ⅓ of whipped whites to chocolate mixture. Do not whisk vigorously. Be gentle. Whisk just until the mixture lightens in color. Switch to a rubber spatula and gently fold in the rest of whites, until no streaks remain.
- Carefully pour the chocolate mixture into prepared pan. Smooth the top out.
- Bake the cake for 15 to 18 minutes ( center should spring back when gently pressed ).
- Leave the cake in the springform and cool completely, at least 1 hour. It will collapse. You can cover cooled cake and refrigerate overnight.
Second layer:
- In a small bowl, mix together cocoa powder and hot water. Set aside to cool slightly.
- In a double boiler, melt chocolate. Cool 3 to 5 minutes.
- In a large mixing bowl of a stand mixer, whip cream, sugar and salt at medium speed. Whip for 30 seconds. It should slightly thicken. Increase the speed to high and whip the cream until soft peaks form. It should happen quite fast ( 20 to 30 seconds ) so do not walk away. Set aside.
- Whisk cocoa powder mixture with melted chocolate until smooth. At first it will look like your chocolate seized but keep whisking. It will come back together and be smooth.
- With whisk, fold in ⅓ of the whipped cream into chocolate mixture to lighten it. Switch to a rubber spatula and gently fold in the rest of the whipped cream, until no streaks remain. It is important or the mousse won't set right.
- Spoon the mousse over cooled cake layer. Tap the form on your countertop 3 times to get rid of any air bubbles. Smooth the top with a spatula. Wipe the inside of the pan with a paper towel from any mousse smudges. Refrigerate the cake for at least 15 minutes so the mousse can set.
Third Layer:
- Sprinkle gelatin over water in a small bowl. Quickly stir with a small spoon. Set aside.
- Place white chocolate in a large mixing bowl.
- In a small saucepan, heat up only ½ cup of cream until boiling. Remove from heat. Add gelatin and stir until completely dissolved.
- Pour the cream and gelatin mixture over white chocolate. Let sit for 20 to 30 seconds, then whisk until smooth. Set aside to cool to room temperature. Stir occasionally. It should slightly thicken.
- Whip the remaining cream at medium speed for 30 seconds. Increase the speed to high and whip until soft peaks form, about 15 to 20 seconds.
- With whisk, fold in ⅓ of the whipped cream to chocolate mixture. Do not whisk vigorously. Gently, until all smooth. Switch to a rubber spatula and fold in the rest of the whipped cream into your chocolate mixture, until no streaks remain.
- Spoon the white chocolate mousse over the semi-sweet chocolate mousse. Smooth the top out.
- Chill the cake for at least 2,5 hours.
- When ready to serve, run the knife around the cake in the pan. Remove sides of the springform.
- For clean cuts, use dental floss or warm but dry knife.
- Decorate slices with chocolate curls. Serve.

shadow1760 says
i've made this desert several times and everytime it has been a huge success. A definite crowd pleaser with a great big wow factor. it looks as pretty as it taste. Rich but light and airy. definitely a project that takes me one night to put together and we enjoy it the next day. I take the extra step of lining the sides with parchment paper which adds a little height to the sides so that it comes apart from the pan very easily and I can fit all the filling in my springform pan that way too. most pans are just under 3 inches high. If you have a pan at least 3 inches high then you're OK. I use craft wire to cut the cake. I used Ghirardelli chocolate and added a little bit of stabilizer to the white mousse 2 give it an extra airiness and stiffness.
CrunchyCreamySw says
Thank you!
Amanda says
Parchment paper! What a great idea for easy pan removal. Also thanks for mentioning the pan height in your comment. Made this for the first time today. I only have small cake pans, about 2 inches high. Oops. Definitely couldn't fit the 3rd layer so I've put it into another cake pan. Crossing my fingers that I can fit it with the other layers later
Amanda says
I Should mention that I'm new to cakes and missed the springform pan reference in the beginning of the instructions. **Anna maybe add a Material section to the recipe card for us newbies? Either way I learned my lesson and will be investing in the right pan, because I will definitely be making this again.
Anna@CrunchyCreamySweet says
Hi Amanda! Thank you for the suggestion! I love it! I am so glad you tried the recipe! Thank you for the comment!
Paula says
What I like most about this cake is that the three layers unite as one. I usually see some sort of separation between them that seems artificial. This is gorgeous Anna, and doesn´t take longer than many breads I make!
Nancy says
Holy crow, Anna - this is divine! Your photos are gorgeous and I can't get over how perfect, creamy, luscious and decadent this cake is. What a labour of love - I hope you got to enjoy every single mouthful of this stunner.
Anita at Hungry Couple says
Beyond gorgeous!!
CrunchyCreamySw says
It is a must-make for sure 🙂 Thanks, Minnie!
Carol | a cup of mascarpone says
Anna, this looks exceptional! Absolutely lovely! Happy Valentine's Day!
CrunchyCreamySw says
Happy Valentine's Day to you too, Carol! Thank you!
Heather Geddert says
in the first layer, when do you add the remaining 1/2 of the brown sugar...?
CrunchyCreamySw says
Hi Heather! Add the remaining brown sugar after the first half of it is mixed in. Thank you for your question!
Amanda @ Once Upon a Recipe says
Wow, this looks incredible! So chocolately and decadent!
CrunchyCreamySw says
Yay! Thanks so much, Amanda!
Savory Simple says
I'm in love with this gorgeous cake!
CrunchyCreamySw says
Juts wait till you try it! Pure heaven! Thanks, Jen 🙂
Sandra Garth says
Oh my gosh Anna, you're making me crazy with all of these tempting desserts. Each day is a party for my eyes!
CrunchyCreamySw says
lol Mission accomplished then 🙂 Thanks, Sandra!
gerryspeirs says
Major kudos for taking this on and making it look so amazing!! Choco heaven...
CrunchyCreamySw says
I've always wanted to try it. So glad I did 🙂 It's amazing! Thanks, Gerry!
greensnchocolate says
Oh my - those pictures!!! Absolutely gorgeous. What a perfect Valentine's Day dessert!
CrunchyCreamySw says
Aww, thank you so much! 🙂
Lizzy Do says
I've made this stunner a couple of times! Everyone always licks their plate clean!!! Your slice is picture perfect, Anna!
CrunchyCreamySw says
I've had it on my to-make list since I saw it on your blog! It truly is amazing! 🙂 Thank you so much, Lizzy!
Anne B says
Well my friend, you are definitely getting 'ooohs and aaahhhs' from me because this dessert is stunning. I can only imagine how sweet, luscious and light it is. And again....those pictures are just beautiful! Beautiful! : )
CrunchyCreamySw says
Oooh, I do hope you will make it. I just know you will love it, Anne! Thank you so much for your kind words about my photos. 🙂 xoxo
CrunchyCreamySw says
Awww, you are such a sweetie, Sally 🙂 Thank you! This cake is as amazing as it looks! You need to try it!
a farmer in the dell says
I'm armed with a fork, a double espresso, and now all I need is a way to reach through my computer screen and take a bite of that lovely cake!
CrunchyCreamySw says
lol Wish you could come over and join me 🙂 Thanks!